
All About the Feather Stitch
The Feather Stitch is a stitch that can confuse almost any embroiderer interested in reproducing Victorian patterns. Why? Because two totally different stitches were called by this name. In early Victorian times the Feather Stitch was a series of long and short stitches, and when made, supposedly resembled bird plumage. It was also called Long and Short Stitch, Solid Kensington Stitch, and for the very proper Victorian lady,” “Opus Plumarium.” Later in the 1880’s and early 1890’s, the Buttonhole Stitch style was being called Feather Stitch.
It seems that even publishers of embroidery books were not sure of the proper sewing of this stitch. Brainerd and Armstrong, one of the leading embroidery book publishers, showed the Buttonhole Stitch style Feather stitch in an 1886 book and yet in books published as late as 1900, they often referred to the “Opus Plumarium” method as the Feather Stitch. By the end of the Victorian Age, however, it appears the stitch, also known as the Coral Stitch, would be from that time forward called the Feather Stitch.
Upon looking at any vintage embroidery pattern, it should be readily seen to which of these two stitches the pattern maker is referring.
Below you will find descriptions for both types of Feather Stitches. I have included the year the information was published so that you can see how confusing the names of embroidery stitches could get in such a short time span.
Feather Stitch – “Opus Plumarium”
From Handbook of Embroidery, 1880
Feather Stitch — Vulgarly called “long and short stitch,” “long stitch” and sometimes “embroidery stitch.” We propose to restore to it its ancient title of feather stitch — “Opus Plumarium,” so called from its supposed resemblance to the plumage of a bird.
We shall now describe it as used for handwork; and later, as worked in a frame (see below: Feather Stitch Worked in a Frame). These two modes differ very little in appearance, as the principle is the same, namely, that the stitches are of varying length, and are worked into and between each other, adapting themselves to the form of the design, but in handwork the needle is kept on the surface of the material.
Feather Stitch is generally used for embroidering flowers, whether natural or conventional.
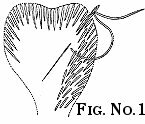
In working the petal of a flower (such as we have chosen for our illustration above), the outer part is first worked in with stitches which form a close, even edge on the outline, but a broken one towards the centre of the petal, being alternately long and short. These edging stitches resemble satin stitch in so far that the same amount of crewel or silk appears on the under, as on the upper side of the work: they must slope towards the narrow part of the petal.
The next stitches are somewhat like an irregular “stem,” inasmuch as they are longer on the surface than on the under side, and are worked in between the uneven lengths of the edging stitches so as to blend with them. The petal is then filled up by other stitches, which start from the centre, and are carried between those already worked.
When the petal is finished, the rows of stitches should be so merged in each other that they cannot be distinguished, and when shading is used, the colours should appear to melt into each other.
In serrated leaves, such as hawthorn or Virginia creeper, the edging stitches follow the broken outline of the leaf instead of forming an even outer edge.
It is necessary to master thoroughly this most important stitch, but practice only can make the worker perfect.
The work should always be started by running the thread a little way in front of the embroidery. Knots should never be used except in rare cases, when it is impossible to avoid them. The thread should always be finished off on the surface of the work, never at the back, where there should be no needless waste of material. No untidy ends or knots should ever appear there; in fact, the wrong side should be quite as neat as the right. It is a mistake to suppose that pasting will ever do away with the evil effects of careless work, or will steady embroidery which has been commenced with knots, and finished with loose ends at the back.
The stitches vary constantly according to their application, and good embroiderers differ in their manner of using them: some preferring to carry the thread back towards the centre of the petal, on the surface of the work, so as to avoid waste of material; others making their stitches as in satin stitch—the same on both sides, but these details may be left to the intelligence and taste of the worker, who should never be afraid of trying experiments, or working out new ideas.Nor should she ever fear to unpick her work; for only by experiment can she succeed in finding the best combinations, and, one little piece ill done, will be sufficient to spoil her whole embroidery, as no touching-up can afterwards improve it.
Feather Stitch Used in Framed Embroidery
This comes from the even lie of the stitches, which fit into and appear to overlap each other, presenting thus a marked contrast to the granulated effect of tent stitches, and the long ridges of the Opus Anglicum, having no hard lines as in stem stitch, or flat surfaces as in satin stitch.
Feather stitch, when worked in a frame, is exactly the same as that worked in the hand, except that it is more even and smooth. The needle is taken backwards and forwards through the material in stitches of varying lengths; the next row always fitting into the vacant spaces and projecting beyond them, so as to prepare for the following row.
Every possible gradation of colour can be effected in this way, and it applies to every form of design—floral or arabesque. Natural flowers have mostly been worked in this stitch.
A skilful embroiderer will be careful not to waste more silk than is absolutely necessary on the back of the work, while, at the same time, she will not sacrifice the artistic effect by being too sparing of her back stitches.
Feather Stitch – Buttonhole Stitch
Belding Revised Needle & Hook, 1900
Click on picture to see more detail.
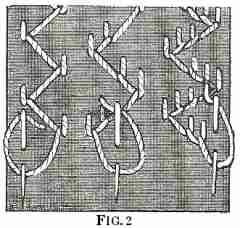
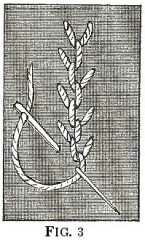
There are several varieties of Feather stitches, but the buttonhole stitch is the basis of them all. Figure 2 above illustrates the one, two and three-point Feather stitches. The appearance of the stitches may be varied by placing the feather points near together or well apart, an by using a fine or a coarse embroidery silk. Figure 3 below illustrates the single point Feather stitch with the points placed close together.
Click on picture to see more detail.
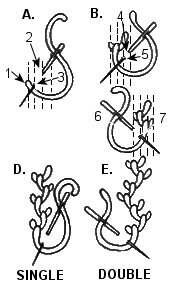
To make Feather stitch: Bring the needle to the surface of the material on the end of the stamped outline and throw the thread in a loop as for a buttonhole stitch. Insert the needle in the material to the right of the place where it first came to the surface, bring the point out inside the loop of thread and pull through. This operation completes a buttonhole stitch and the first point of the single Feather stitch, See Figure 3. For the second point, throw the thread in a loop toward the right and set the needle in the material just below the first point of the feather, with the point of the needle slanting toward the left; pull the needle through the material and inside the loop formed by the thread. Throw the thread in a loop to the left and repeat another stitch below the one last completed. See detail illustration below for more concise placement of the needle.
Buttonhole Style Feather Stitch Summed Up
Return to top of Feather Stitch page.
Return to Embroidery Stitches page.
Return to Home page.

|
||
|
||
|
||
|
||
 433 pages!

