Childs Crocheted Cap
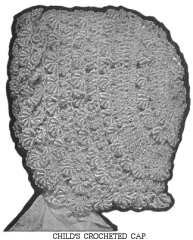
A Childs crocheted cap was such a common item that Victorian ladies would work at making their design unique. You can find hundreds of different designs for a child's crochet cap online. This one is nice as it can be used for winter or summer as the article explains.
This was published in Lessons In Embroidery, by the Brainerd and Armstrong Company, c. 1899.
Child's Crocheted Cap
This cap is a very handsome one and is suitable for either warm or cool weather, since the instructions include directions for a wool lining which may be used or not as desired. Make a chain of 6 and join. Do 12 single crochets into the ring and join with a slip stitch.
Materials Needed
for Child's Crocheted Cap
- Two ½ ounce balls Brainerd & Armstrong or Corticelli Crochet Silk, size 300
- 1 ounce Zephyr or Saxony
- ¼ yard Cream White China Silk for ties
- Use a No.1 Star crochet hook
Directions for
Child's Crocheted Cap
Make a chain of 6 and join. Do 12 single crochets into the ring and join with a slip stitch.
1st round — Draw silk up well on needle and fasten with a sl. st. *Throw silk over needle 16 times and insert needle in first s. c., draw through all loops on needle and fasten with sl. st.* Repeat in same hole. Continue throughout the round by putting two such stitches into every s. c. of foundation ring. This should give 24 cone — shaped stitches in circle. Then join with a sl. st.
2d round — *Crochet chain of 3 and do a d. c. between first two cone stitches, chain 3 and fasten with a sl. st. in top of d. c. just made, chain 4 and fasten in same hole, chain 3 and fasten in same hole, chain 3 and do a s. c. between next two cones.* Repeat throughout the round. This should give 12 points. See Fig. below.
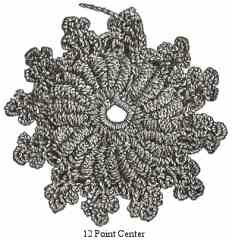
3d round — Carry silk up the side of the first point by doing s. c., fasten in top point, *chain 7 and fasten in next top point.* Repeat.
4th round — *Do a d. c. in each of the 7 chains and as. c. in the next.* Repeat.
5th round — Chain 6 and *do a d. c. in the 2d stitch of previous round, chain 1 between and do a d. c. into 4th, chain 1 and do a d. c. into 6th, chain 1 and do a d. c. in same hole.* Repeat.
6th round — Same as 2d round, only you should now have 30 points in circle.
7th round — Same as 3d, only chain 6 between instead of 7.
8th round — *Throw silk over needle 16 times, insert needle in first s. c. of previous round, draw through all loops on needle and fasten with a sl. st. Repeat in same hole 6 times. Do a s. c. into the next s. c. of previous round.* Repeat. This should give you 15 groups of 6 cone-shaped stitches, or shells.
9th round — Chain 8 and *do a s. c. in middle of first group of cones, chain 5 and do a d. c. in the next s. c. of previous round.* Repeat.
10th round — *Do a d. c. into 5 of the chains and a s. c. into the next.* Repeat.
11th round — Chain 6 and *do a d. c. in every other stitch with a chain of one between.* Repeat.
12th round — Same as 2d, only you should now have 48 points.
13th round — Same as 3d, only chain 4 between instead of 7.
14th round — Same as 8th round, only you should now have 24 groups of 6 cone stitches, or shells.
15th round — Same as 9th, only chain 4 between instead of 5.
16th round — Same as 2d, leaving off to within 5 groups of shell. This leaves you 38 points.
Saxony Lining
Make a chain of 5 and join, do 20 doubles into ring and join with a sl. st. Do 6 rounds in plain doubles, widening as you progress to keep from cupping; next 3 rounds do not widen. Begin to work in rows now by leaving off to within 15 stitches of the last round. Make 7 rows of plain doubles. Fasten this foundation cap or lining inside the silk one with a thread of crochet silk. This can be crocheted with a bone needle, while the silk cap is done with a medium size steel needle.
Return to top of Child's Crocheted Cap
Return to Victorian Crafts page.
The Last and Best Book of Art Needlework
Over 100 pages of authentic Victorian instructions and patterns from 1895!
FREE
Beeton's Book Of Needlework
433 pages!
Sign up for VEAC! Everything you wanted to know about Victorian embroidery, needlework, crafts and more!
Priscilla Bead Work Book
Make Beautiful Victorian Beaded Purses, Jewelry & Accessories - Starting
TODAY!


